When it comes to moving house, a major task will be moving your kitchen appliances safely to your new house. These are some of the heaviest items you'll be moving and will require special and attentive handling if you're moving them without the help of a removals company.
If you attempt to move your kitchen appliances without knowing what you're doing, you run the risk of causing damage to your items, potentially having to fork out for brand-new appliances.
If your new house comes with appliances or your current ones have seen better days, you should look at recycling your old kitchen appliances. However, if you're going to be taking them with you, you need to know exactly how to move them.
We've compiled the ultimate guide to help you safely move every kitchen appliance to your new house. From how to move your oven to safely moving your fridge, we've got you covered.
How to Disconnect Your Kitchen Appliances
To safely pack and move your kitchen appliances, you will first need to disconnect them - especially the larger items such as your washing machine, dryer and dishwasher. This will likely require assistance and ideally, be done by a professional. It's important to note that some verified removal companies will offer to disconnect your appliances for you, but this isn't an additional service offered by every company.
To protect your flooring when moving these larger items, place a blanket or towel on the floor surrounding the appliance before moving it. If possible, use the 'shipping bolt' that comes with the washing machine as it will help the tub keep its shape. You can then begin the process of disconnecting the taps behind the unit. Do not continue without professional help if you're unsure as you could damage the item.
If you encounter any issues at this stage, it's recommended that you contact a plumber to help protect your kitchen appliances.
When loading larger kitchen appliances onto the removal van, you need to make sure they are all stood upright to reduce the risk of damage during the journey. If successful, you can then unload the appliances and place them in your new home. If you have trouble connecting them to the appropriate utilities, you could ask your removal company, handyman or plumber for help.
When settling into your new home, make sure you carefully watch the larger appliances to highlight any leaks or defects created by the installation process.

Compare Removal Costs
Save up to 70% on Removal Costs
Used by over 1 million movers in the UK
How to Move an Oven
Larger kitchen appliances like ovens need extra care when they are being moved to prevent damage to the appliance itself, as well as your flooring. Keep in mind, that if your oven is mounted to the wall, you will have to call in professional removals services to get the job done. We've compiled these tips on how to move your oven when moving house.
1. Read the Manual
Every oven differs in design, so the manufacturer’s manual will tell you exactly what you need to do for that particular oven. If you don't have the manual, you can contact the dealer for another copy or check the manufacturer's website.
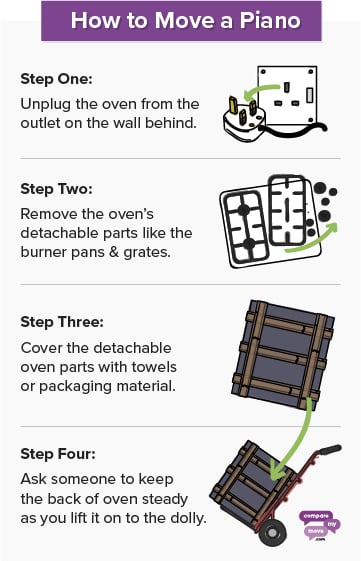
2. Turn off Electric
Before attempting to move your oven, you should turn off the electric power to avoid causing any damage to yourself. You should unplug the oven from the outlet on the wall behind.
3. Shut off the Gas
If you have a gas oven, shut off the gas line by turning off the main valve in the gas line that goes to the oven. This is usually found on the wall behind the oven.
4. Use a Dolly
Slide the moving dolly under the oven to move it away from the wall. Then, lower the dolly, shut off the gas and unhook the gas attachment to the stove from the gas line.
5. Remove Detachable Parts
Remove the oven’s detachable parts like the burner pans and grates to avoid them being dropped and damaged during the move. Keep these parts together so it's easier when it comes to setting up the oven in your new house.
6. Protect Oven
Cover the detachable oven parts with towels or packaging material to protect them from damage during the move. You should then pack the loose parts in a labelled box to avoid misplacing them, and making it easier when you're setting up the oven in your new house.
7. Move the Oven
Lift the dolly and slide the oven out of its space in the wall. Ask a friend/family member to keep the back of the oven steady to prevent it from toppling backwards and scratching your flooring.
Compare Removal Costs
Save up to 70% on Removal Costs
Used by over 1 million movers in the UK
How to Move a Washing Machine
To move your washing machine to your new home, you will want to refit it into the original packaging that came with your washing machine. There should be instructions on how to do this in the manufacturing manual. Here are our top tips to safely move your washing machine.

1. Disconnect Washing Machine
You'll need to disconnect the washing machine from the plumbing, get rid of the water and then secure the drain hose. To do this, turn off the water valves which are usually found behind the washing machine and attached to the wall. Turn the valves clockwise until they can’t be turned any further.
2. Detach Hoses from the Machine
Detach the hoses from the washing machine by turning the screws connecting them anticlockwise until they are loose. Then, get a bucket and point the ends of your hoses into it to drain any water.
3. Keep Track of Loose Parts
Try to secure any hoses, mains cables and plugs to the lid of your washing machine using strong tape to prevent them from getting lost during the move. This will make it easier for you when it comes to attaching them back on.
4. Use a Dolly
As you did with the oven, tilt your washing machine back so the front legs are lifted, and slide a towel underneath so you can move it without damaging the floor. If you have a dolly, you can simply lift it on to there.
5. Move the Washing Machine
When you move the washing machine, keep it upright. If you are transporting it in a smaller car and this isn’t an option, lay it on its back. In this case, you should make sure the water is completely drained so it doesn’t run into the electrical parts at the back of the machine.
Compare Removal Costs
Save up to 70% on Removal Costs
Used by over 1 million movers in the UK
How to Move a Dishwasher
When you move your dishwasher, you must be sure all dishes and cutlery are removed from the inside before attempting to move it. A dishwasher is large, and you don’t need any added weight when you’re trying to move it. Run it through a clean when it’s empty just to ensure the inside is as spotless as possible ready to be used in your new home. Here are our best tips on moving your dishwasher.

1. Remove Dishwasher from Wall
Whether you’re in a house or flat, dishwashers are often embedded in the kitchen by the sink or next to the washing machine. To remove it, you should find a set of screws or bolts keeping it in place. All you need to do is remove them to slide them out of place.
2. Remove Interior Parts
Remove all the interior removable parts of the dishwasher, such as the racks and baskets, and pack them separately so they don’t damage the dishwasher when they’re being moved.
3. Disconnect from Power
When you move your dishwasher out of its space in the kitchen, the wires connecting it to the power source should be found at the back. Unplug it from all the outlets and tape the wires to the top of it.
4. Remove Hoses
The hoses connected to the dishwasher as well as the exterior ones connected to the water lines need to be removed and packed separately. Refer to your manufacturer's manual for instructions on how to properly disconnect the hoses, as each one differs.
5. Keep Hoses Secure
Once you've removed them, place the hoses carefully in a box and make sure you label them so you can easily find these parts when you unpack at your new home.
6. Protect Dishwasher
Before you move it, wrap the dishwasher in a thick moving pad or blanket for protection. Secure in place by tying a rope or twine around the dishwasher to prevent the blanket from shifting during the move.
7. Use a Dolly
Now it has been removed, you can move the dishwasher with the help of a dolly, so you can wheel it out of your home.
Compare Removal Costs
Save up to 70% on Removal Costs
Used by over 1 million movers in the UK
How to Move a Fridge
With proper planning and and preparation, moving your fridge doesn't have to be a hard task. We've compiled a step by step guide with the best tips to move your fridge during your house move.

1. Empty Fridge
Remember to empty your fridge of all its contents, including food, trays, ice cube trays and shelves – anything that can rattle around while your fridge is in transit.
2. Remove Shelves
Remove and wrap the shelves in towels to protect them and place them in labelled boxes so you can find them when you’re unpacking.
3. Unplug Fridge
Unplug the fridge, coil the cord and tape it to ensure it stays in place during the move. If you have an ice maker, disconnect it from the water source too.
4. Defrost Freezer
You also need to defrost your freezer if frost has built up. Keep in mind that defrosting takes between 6-8 hours, so make sure to do it ahead of time, ideally the night before.
5. Secure Fridge
On moving day, close and secure the fridge doors by tying a bungee cord around them. You shouldn't use tape as it can end up ruining the finish on your fridge.
6. Get Help with Stairs
If you have to deal with stairs, make sure at least two people are involved. Strap the fridge to the lifting dolly and make sure one person is at the front, and the other behind, holding on to it.
7. Transport Fridge on its Side
When you’re putting your fridge into your car or van, make sure it’s lying on its side and never on its back. Lie it on the side opposite the door hinges so that it isn’t straining to open and cause damage.
Compare Removal Costs
Save up to 70% on Removal Costs
Used by over 1 million movers in the UK
How to Move Smaller Kitchen Appliances
Once the heavy lifting is complete, you can start packing and moving your smaller kitchen appliances such as the microwave, kettle, toaster, blender and anything else you may own.
Unplug and Clean the Appliance
First, you will need to safely unplug the kitchen appliance you are packing and begin cleaning it - this will reduce the amount of mess within the moving box being used. Make sure the appliance is fully dry before you begin packing.
Remove Detachable Parts
If the appliance has any detachable parts, it would be wise to remove these now before packing to reduce the risk of damage. Pack them separately but make sure they're placed in the same moving box so they do not get lost.
Locate the Original Packaging
If possible, it's always recommended that you pack the appliances in the original packaging and boxes you originally bought them in. This will provide optimum protection. If you no longer have the original box, there are plenty of places to find free cardboard boxes for moving.
Use Quality Packing Materials
Whether you ask your family and friends for materials or your chosen removal company, you must use quality packing materials to protect your items during transit. Make sure you use lots of bubble wrap, packing paper, newspapers or even towels to protect the more fragile appliances.
Fill Any Spaces
Do not leave gaps between items in the moving boxes as this will allow the items to move about freely, increasing the risk of damage. Try to fill any open space with packing paper, newspapers or even your clothes.
Carefully Load the Removal Van
Finally, you will need to begin arranging the moving boxes in the van. When moving kitchen appliances, make sure you put the lighter objects and boxes on top of the heavier ones. This will again reduce the risk of damage as the heavier items will be more secure.
Compare Removal Costs
Save up to 70% on Removal Costs
Used by over 1 million movers in the UK
Save Space By Using Self-Storage
Depending on the size of your new property, you may not have enough space to hold all of your kitchen appliances once the move is over. Self-storage can be a vital solution to ensure a more efficient and organised house move, especially if you're downsizing or moving temporarily.
Renting a self-storage unit can provide you with enough space to keep your beloved items whilst also ensuring your new kitchen isn't cluttered or overflowing. Storage units come in a variety of sizes with the option of having climate-controlled storage should you be moving specialist or valuable items.
Save Time and Money on Your Home Removal
Now that you saved money on moving your kitchen appliances, why not save money and time on the cost of your house move? We'll connect you with up to 6 professional and friendly home removal companies in your area, saving you up to 70% off the cost.